Monday, June 29, 2009

Where the heck have I been?

Uhh, Paris. Of course.
Sure, maybe that was over a month ago. And maybe I've baked a million things since then and took pictures of many of them and really really thought about blogging but instead decided to check and see if any friends updated their Facebook. Whatever. Call me lazy.

I'm lazy and a procrastinator and have been happily baking and eating my way through the month of June without paying any attention to my blog, but perhaps you'll forgive me if I tell you I brought you a souvenir from Paris?

First, I have to back up a little bit and say (once again) that I've got a fantastic husband. Ugh, I know, you're tired of hearing it. But he really is super great. So great that he got me maybe the best Mother's Day present ever... a weekend in Paris PLUS two days of classes at Le Cordon Bleu. Seriously awesome. On the first day I did a market tour and then watched the chef prepare a beautiful meal with fresh ingredients. And then on the second day I did a more hands-on class where I learned how to make croissants, pains au chocolat, and several variations of brioche. Ohhh, the pastries. Ben signed me up for that one just so he could have as many croissants as his tummy could hold (he was not disappointed).

But the recipe that I bring you today is not pastry. It is instead from the market tour demonstration and it is much easier! No rolling and folding and chilling and rolling and flouring and praying! And wonderful for summer! And easy! Magnifique! I highly encourage you to make this and sit outside and eat while closing your eyes and transporting yourself to France. Sipping a glass of the leftover cabernet isn't a bad idea either....


Chilled Strawberry Soup

500 g strawberries
250 ml freshly squeezed orange juice
250 ml cabernet
100 g sugar
20 black peppercorns
50 fresh ginger, grated
1 vanilla bean
3 star anise
3 cardamom pods (whole or crushed)

Pour the juice into a small saucepan. Split the vanilla bean and scrape the seeds into the juice and then add the pod as well. Add peppercorns, ginger, star anise and cardamom and bring to a boil. Lower heat and simmer until reduced, and then remove from heat and place the pan in an ice bath.

Halve the strawberries and place them in a large bowl with the sugar and let sit for a few minutes. Add the wine to strawberries, and when the orange juice is cool, strain and pour over strawberry mixture. Cover and chill in the refrigerator for about 30 minutes.

You can serve this with whipped cream, or if you're like me and routinely forget to buy things like cream, a little yogurt with honey and vanilla beans is also lovely.


Bon appétit!

Wednesday, April 22, 2009

Iron Cupcake Earth: Soda Pop

I'm a bit of a procrastinator. I always have a list of things I should do and I never seem to get to them. At least, not in a timely manner. For example, I should put Wesley's too small clothes up in the attic to make room in his dresser, read the baby sleep book that Ben finally got around to finishing (we're a procrastinating family), wash the dogs because they're getting a little ripe (but they go to the dog farm when we go on vacation next week, so a bath now would be useless, right?), and perhaps finally put away the Christmas decorations that we stuck up in the guest room "temporarily" when we finally managed to de-Christmas our living room in January.

So, yeah. I put things off. That it why I am super proud of myself for managing to bake appropriately themed cupcakes for Iron Cupcake before the deadline! Two months in a row now! Miracle! I even managed to plan ahead and have my wonderful parents send me ingredients that I can't get here.

And my superb planning and motivation + great parents who put up with my postal requests =

Root Beer Float Cupcakes!


The theme this month was Soda Pop, and my immediate thought was root beer floats. I had about 800 other ideas too, but Ben immediately suggested root beer when I asked him for ideas, and I trust his cupcake eating expertise so I went with it.

The result? We thought they were delicious, but you absolutely must use the glaze. The cupcakes themselves are nice enough, but somehow even with the massive amount of sugar and sweetness from the soda, they still tasted more like a sort of nice muffin to me. And muffins are good and everything, but cupcakes should taste like dessert. The glaze pushed them just over the edge into the sweet and wonderful dessert category. The frosting didn't hurt either.

Root Beer Float Cupcakes

2 1/2 cups root beer
1 tablespoon root beer extract
1 teaspoon vanilla extract
2 cups dark brown sugar
1 cup butter
2 eggs
3 cups all purpose flour
1 tablespoon baking powder
2 teaspoons baking soda
1/2 teaspoon salt
Root beer glaze
Vanilla buttercream frosting
Crushed root beer candies

Preheat oven to 350ºF.
In a bowl, mix together root beer, root beer extract and vanilla extract and set aside.
In a separate bowl, cream together butter and sugar until light and fluffy. Add eggs, mixing well after each one. Sift together flour, baking soda, baking powder and salt. Mixing at a low speed, add flour mixture and root beer alternatively, beginning and ending with flour. Mix until smooth and pour into a lined cupcake pan, filling about 2/3 full. Bake cupcakes about 15-18 minutes for normal cupcakes and 12 minutes for the mini cupcakes, until golden brown and cake springs back when touched.

Root Beer Glaze

1/2 cup root beer
1 teaspoon root beer extract
2 cups powdered sugar

Whisk together root beer, extract and sugar in a small saucepan and bring to a boil. Reduce heat and cook, stirring occasionally until reduced by about half. Let cool.

Spoon a little root beer glaze over each cupcake and let set until cupcakes are completely cool and tops are dry. Top with vanilla buttercream and crushed root beer candies.


Yum!

The voting begins on April 29, and you can go vote for me at http://www.ironcupcakemilwaukee.com. Please vote for me! Pleeeeeeease! If I win, I will be the proud recipient of many fabulous prizes:

Our April ETSY PRIZE-PACK is from artists:

Last and certainly not least, don’t forget our corporate prize providers: HEAD CHEFS by FIESTA PRODUCTS, http://www.fiestaproducts.com, HELLO CUPCAKE by Karen Tack and Alan Richardson, http://blog.hellocupcakebook.com, JESSIE STEELE APRONS http://www.jessiesteele.com; TASTE OF HOME books, http://www.tasteofhome.com; a t-shirt from UPWITHCUPCAKES.COM http://www.upwithcupcakes.com/. Iron Cupcake:Earth is sponsored in part by 1-800-Flowers, http://www.1800flowers.com .


Wednesday, April 15, 2009

Cocoa Apple Cake

Living abroad brings lots of good things - adventure, travel, new experiences, new points of view, the opportunity to learn, grow, eat. I am so grateful that we had the opportunity to move to the Netherlands and I haven't regretted it once.

But even though I wouldn't trade our experience for anything, it has its downside, too. Sometimes I just get lonely and homesick. It's natural, I guess. You miss things - your favorite places, your favorite people, conveniences that you took for granted, speaking English, and just the comfort of feeling like you are where you are supposed to be.

I can't do much about the thousands of miles between our house and "home", but I can find a little bit of comfort here.

Comfort in the form of cake.


Cocoa apple cake has been one of my favorites for years. This might surprise those who know me because, while the cake does have a little chocolate, it is not chocolate with milk chocolate mousse and dark chocolate ganache and white chocolate shavings. Nope, no death by chocolate. It's just simple and happy and sweet and good. And it tastes kind of like home, and that's just what I need. And licking the cocoa glaze pan doesn't hurt either.

Cocoa Apple Cake
  • 3 eggs
  • 2 cups white sugar
  • 1 cup butter, softened
  • 1/2 cup water
  • 2 1/4 cups all-purpose flour
  • 2 tablespoons unsweetened cocoa powder
  • 1 teaspoon baking soda
  • 1 tablespoon ground cinnamon
  • 3/4 cup semisweeet chocolate chips
  • 2 apples, chopped
  • 1 teaspoon vanilla extract
Cream together the eggs, sugar, butter or margarine, and water until fluffy . In another bowl, sift together the flour, cocoa, baking soda, and spices. Add dry ingredients to egg mixture and mix well. Fold in chocolate chips, apple, and vanilla extract. Spoon into a buttered and floured bundt pan. Bake at 325 degrees F (165 degrees C) for 60 to 70 minutes until cake tests done. Let cool completely and then drizzle cocoa glaze over the top.


Cocoa Glaze

  • 2 tablespoons butter
  • 1/4 cup cocoa
  • 3 tablespoons water
  • 1 1/4 cups powdered sugar
  • 1/2 teaspoon vanilla
Melt butter in a small saucepan with cocoa and water. Blend in sugar and vanilla. Let cool slightly, stirring again if necessary before drizzling over cake. Mmmmmm.


Thursday, April 2, 2009

Love affairs

Do you ever wonder how I'm not 800 pounds? I mean, have you seen all the cupcakes and cookies and cake and ice cream and... well, everything? Truly, I have a love affair with frosting. Sugar is my kryptonite. Chocolate will always have a special place in my heart and in my fridge. Cookies have never let me down.

But... One cannot live on sugar alone. So I have to confess... I'm in love with vegetables. My heart skips a beat when I see the beautiful piles of produce at our market. I dream of roasted zucchini, grilled portabellos, sauteed spinach. The phrase "Oooooh, vegetables!!!" often escapes my lips in moments of glee.

Dessert may be my one true love, but I eat vegetables on the sly and I just can't quit them. This works out well for me, though. Because while I indulge my dessert loving side every once in a while (and exile the brownies to Ben's workplace the rest of the time), I eat piles and piles of vegetables on a daily basis and it balances out the frosting habit. Often I can think of nothing better than a big plate full of veggies for dinner.

With this in mind, it should come as no surprise that I'm a big fan of ratatouille. My ratatouille recipe (which I borrowed from Epicurious and tweaked to my tastes) is not fancy. It doesn't have carefully arranged slices of squash, artfully displayed in a beautiful dish. It doesn't need it, because it's got flavor and love and comfort. And enough vegetables to make me smile and sigh and rub my belly happily.


Ratatouille

* 1 eggplant, cut into 1/2-inch cubes
* 400 grams of shallots, quarterd
* 3 tablespoons olive oil
* coarse salt to taste
* 2 zucchinis or yellow squash, cut into 1/2-inch cubes
* 2 large red bell peppers, cut into 1/2-inch cubes
* 2 cans diced tomatoes
* 7 garlic cloves, minced
* 1 teaspoon chopped fresh thyme
* 1 teaspoon chopped fresh oregano
* 1/4 cup finely chopped fresh basil

* grated Parmigiano-Reggiano


Preheat oven to 450°F.

Stir together eggplants, onions, 2 tablespoons oil, and kosher salt in a large roasting pan, then roast mixture in middle of oven, stirring occasionally, 15 minutes. Stir in squash, bell peppers, 1 tablespoon oil, and more kosher salt and roast mixture, stirring occasionally, until bell peppers are tender, 25 to 30 minutes.

While vegetables are roasting, simmer tomatoes, garlic, thyme, and kosher salt in a heavy saucepan, stirring occasionally, until thickened, 12 to 15 minutes. Stir tomatoes into roasted vegetables and season ratatouille. Top with grated cheese.


Left to my own devices, I would eat this all by itself, day in and day out. But it is also delicious as a side to roasted chicken, with polenta (as we have it here) or a nice crusty bread, or served over pasta.


And then have a cupcake for dessert!

Wednesday, April 1, 2009

It's that time again...


Time to support our military with baked goods!

For this round of Baking Gals, I'm not hosting a team, but I didn't want to miss out on my chance to say thank you to our hardworking deployed military men and women, so I signed up for a team and got down to baking! I highly encourage you to do the same! It will make you feel good and you can munch on a cookie or two while you're packing them up. Everybody wins!

This month I made Chocolate Crinkle Cookies and Snickerdoodle Blondies. I wanted to good, simple, yummy treats that would hold up well when shipped and I think these fit the bill.


Chocolate Crinkles from Betty Crocker

1/2 cup vegetable oil
4 oz unsweetened baking chocolate, melted, cooled
2 cups granulated sugar
2 teaspoons vanilla
4 eggs
2 cups all-purpose flour
2 teaspoons baking powder
1/2 teaspoon salt
1/2 cup powdered sugar

1. In large bowl, mix oil, chocolate, granulated sugar and vanilla. Stir in eggs, one at a time. Stir in flour, baking powder and salt. Cover; refrigerate at least 3 hours.
2. Heat oven to 350°F. Grease cookie sheet with shortening or cooking spray.
3. Drop dough by teaspoonfuls into powdered sugar; roll around to coat and shape into balls. Place about 2 inches apart on cookie sheets.
4. Bake 10 to 12 minutes or until almost no imprint remains when touched lightly in center. Immediately remove from cookie sheets to cooling racks.


Snickerdoodle Blondies

2 2/3 cups all-purpose flour
2 teaspoons baking powder
1 teaspoon cinnamon
1/4 teaspoon grated or ground nutmeg
1 teaspoon salt
2 cups packed brown sugar
1 cup butter, room temperature
2 eggs, at room temperature
1 tablespoon vanilla extract
2 tablespoons granulated sugar
2 teaspoons cinnamon
a pinch nutmeg

1. Preheat oven to 350 degrees F. Lightly grease and/or line a 9×13 inch pan. Combine the flour, baking powder, cinnamon, nutmeg and salt and set aside.
2. In large bowl, beat together butter and brown sugar for 3-5 minutes. Add in the eggs one at a time, then the vanilla, and beat until smooth.
3. Stir in the flour mixture until well blended. Spread evenly in prepared pan (mixture will be somewhat cookiebatter-ish, so it’s best to spread it out with a greased spatula or your hands). Combine the granulated sugar, cinnamon, and nutmeg in a little bowl. Evenly sprinkle cinnamon sugar mixture over the top of the batter.
4. Bake 25-30 minutes or until surface springs back when gently pressed. Cool before cutting. Makes 20-24 bars.

Sunday, March 29, 2009

You know those cupcakes down in my previous post? They look good, huh? Wanna go vote for them in this month's Iron Cupcake challenge? Oui?

Okay, go to No One Puts Cupcake in a Corner, check out all the amazing entries, and vote from now until Friday, April 3! It's fun!

And if you vote for me, I'll give you a cupcake!*


*offer good only you come visit me in the Netherlands.

Monday, March 23, 2009

Iron Cupcake Earth: Nuts and Seeds


I was trying to think of a witty story to tell about my cupcake baking adventures and mishaps this weekend, but I kept coming up with nothing. Just cupcakes, yummy cupcakes. I joined Iron Cupcake last month, but didn't make a coffee themed cupcake because... well... baby, tired, sniffly, bored, baby, excuses, excuses... And so last week I was sitting, looking at frosted food porn on my computer, and all of the sudden realized, "Shoot! I'm going to miss the deadline again! I need to make cupcakes!"

So I did. I made cupcakes. This month is Nuts and Seeds, so I brainstormed a list of ideas and sent them to work with Ben so he could poll his colleagues. I figured I would let them choose because A) Once I start coming up with cupcake ideas I can't turn off my brain and there's no way for me to pick just one, and B) They are the lucky consumers of all of my baked goods, so I thought it might be nice to leave the choice up to them.

And they chose...

Chocolate cherry cupcakes with an amaretto cream filling and almond buttercream.

a.k.a. the only nutty cupcakes that will ever grace Ben's tastebuds.
Ben absolutely abhors nuts, all nuts, anything vaguely nutty, and yes, that includes peanut butter, pistachios, Nutella, and anything else that might fill in the blank in your question, "But what about ____? Not even ____?" Nope. No nuts. The only teeny tiny exception is almond flavoring. The actual nut is out, but he finds almond extract downright pleasant. Go figure.

So even though this month's Iron Cupcake theme is nutty, Ben was able to taste (and taste, and lick the bowls, and pat his stomach contentedly) and declare that my cupcakes were good.

Chocolate Cherry Cupcakes
* 3/4 cup unsweetened cocoa powder
* 2 cups all-purpose flour
* 1 1/2 cups sugar
* 1 1/2 teaspoons baking soda
* 3/4 teaspoon baking powder
* 3/4 teaspoon salt
* 2 large eggs
* 3/4 cup warm water
* 3/4 cup sour cream
* 3 tablespoons canola oil
* 1 teaspoon almond extract
* 1 cup cherry preserves

Preheat oven to 350 degrees. Line standard muffin tins with paper liners; set aside. Sift together cocoa powder, flour, sugar, baking soda, baking powder, and salt into a large bowl.
Add eggs, warm water, sour cream, cherry preserves, oil, and almond extract, and mix until smooth.

Fill muffin cups about 2/3 full and bake until tops spring back when touched, about 20 minutes, rotating pan once if needed. Transfer to a wire rack; let cool completely.


Amaretto Whipped Cream

* 1/2 tsp gelatin
* 1 tbsp water
* 1 cup heavy cream
* 2 tbsp powdered sugar
* 1/4 cup amaretto

In a small bowl, sprinkle gelatin over 1 tablespoon of cold water. Set the container into about 1 inch of hot water in a saucepan and let stand until gelatin dissolves. Remove from the hot water. Set aside for a minute to cool slightly. Whip the cream until almost stiff, then add the gelatin, amaretto, and confectioners' sugar. Continue whipping until stiff.

For the frosting, I used my regular buttercream recipe, found here, but I used a tablespoon of almond extract instead of the vanilla.

Cupcake assembly

Using a small knife, cut a cone shape out of the top of each cupcake. Set aside. Spoon a bit of whipped cream into the hole and replace the top of the cupcake. Frost. I topped the cupcakes with maraschino cherries because I love them and they're pretty. I think they would also be good with chocolate shavings, slivered almonds, or all of the above.


Competing in Iron Cupcake is not only fun, but also comes with prizes for the winner!

The March ETSY PRIZE-PACK is from artists:
Last and certainly not least, don’t forget our corporate prize providers:
HEAD CHEFS by FIESTA PRODUCTS, http://www.fiestaproducts.com,
HELLO CUPCAKE by Karen Tack and Alan Richardson, http://blog.hellocupcakebook.com,
JESSIE STEELE APRONS http://www.jessiesteele.com;
TASTE OF HOME books, http://www.tasteofhome.com;
a t-shirt from UPWITHCUPCAKES.COM http://www.upwithcupcakes.com/.
Iron Cupcake:Earth is sponsored in part by 1-800-Flowers, http://www.1800flowers.com .

Thursday, March 19, 2009

I'm a little cupcake, short and stout

I've been wanting to try making chocolate stout cake for quite some time and I've had my eye on this recipe from Epicurious. And I figured that St Patrick's Day would be a perfect occasion to break out the Guinness. And I could add some Bailey's Irish Cream in there somewhere! Totally appropriate, right? And potentially delicious! I was going to bake up a big batch and send them to work with Ben on Tuesday.

I was totally planning on baking Monday. I had the Guinness in the fridge and some mini bottles of Bailey's. And chocolate, I always have a few pounds of chocolate in my kitchen. (I'm serious. If you ever are having a chocolate crisis, you know where to find me.) Ben thwarted my cupcake plans, though. The guy offers me a last minute weekend trip to Paris. How is a girl supposed to turn that down? So instead of spending Monday in the kitchen I woke up, got some croissants, strolled through Montmartre, enjoyed some pastries made by people much more talented than me. Rough life, I know.

The cupcakes were not forgotten, though. I just made them a couple days later than intended. And who are we kidding? Ben's colleagues couldn't care less when delicious treats arrive, just as long as we keep them coming.


I made the chocolate stout cupcakes, but halved the original recipe because the reviews all said that the recipe made an insane amount. With the halved recipe I got 24 cupcakes, so unless you really want to make a huge cake, I wouldn't make the full recipe.

I then filled it with a Bailey's and white chocolate whipped cream. Yum. And then frosted the cupcakes with a simple dark chocolate ganache. Because, you know, I wouldn't want to overdo it. Ha.


These were really delicious. Really. Really. Really. I want to eat this cake every day. Ben and I agreed that it was a practically perfect chocolate cake. Deeply chocolatey, but not too rich. Dense, but not heavy. Moist, light, but holds together well. I'm in love. And no, we couldn't taste the Guiness in the finished cupcakes. Just chocolatey wonder. And the cream filling was really good too. In the picture, you can tell it's soaked into the cupcake a bit. This is because I'm impatient and can't wait for cupcakes to cool completely. If you prefer your filling to hold its own better, sit on your hands, go for a walk, resist the urge to play with the cupcakes until they are completely cool.

Another note on the filling. White chocolate can be fussy to work with sometimes. Be sure you use really high quality chocolate, and if you wanted to just make a Bailey's whipped cream, that would be perfectly wonderful in these cupcakes too.

Cupcakes
  • 1 cup stout (such as Guinness)
  • 1 cup unsalted butter
  • 3/4 cups unsweetened cocoa powder (preferably Dutch-process)

  • 2 cups all purpose flour
  • 2 cups sugar
  • 1 1/2 teaspoons baking soda
  • 3/4 teaspoon salt
  • 2 large eggs
  • 2/3 cup sour cream
Preheat oven to 350°F. Line cupcake tin with paper liners. Bring stout and butter to simmer in heavy large saucepan over medium heat. Add cocoa powder and whisk until mixture is smooth. Cool slightly.

Whisk flour, sugar, baking soda, and salt in large bowl to blend. Using electric mixer, beat eggs and sour cream in another large bowl to blend. Add stout-chocolate mixture to egg mixture and beat just to combine. Add flour mixture and beat briefly on slow speed. Using rubber spatula, fold batter until completely combined. Fill cupcake tins about half to two thirds full. Bake cakes until tester inserted into center of cakes comes out clean, about 25 minutes. Turn cupcakes out onto rack and cool completely before filling and frosting.

Bailey's White Chocolate Cream

  • 4 ounces good-quality white chocolate (such as Lindt or Baker's), chopped
  • 4 tablespoons Bailey's Irish Cream
  • 1 cup chilled whipping cream
Combine chopped white chocolate and Bailey's in small metal bowl. Set over small saucepan of simmering water and stir until white chocolate melts and mixture is smooth. Remove bowl from over water. Cool white chocolate mixture about 10 minutes. Beat chilled whipping cream in medium bowl until soft peaks form. Whisk in white chocolate mixture.


Chocolate Ganache

  • 6 ounces dark chocolate, chopped
  • 3/4 cup heavy cream
Place chocolate in a bowl. Bring cream to a simmer in a small saucepan. Pour hot cream over chocolate and let sit for 1 minute. Stir chocolate and cream until chocolate is melted and mixture is smooth. Let chocolate cool until it reaches desired thickness.

Cupcake assembly


Using a small knife, cut a cone shape out of the top of each cupcake. Set aside. Spoon a bit of whipped cream into the hole and replace the top of the cupcake. Spoon a bit of ganache over the cupcake. Eat 5 cupcakes and pass out on the kitchen floor. Repeat.


Monday, February 23, 2009

Pizza My Heart

If you know us at all, you probably know that we have plans on Friday nights. And even though we are flexible and willing to break our plans, our friends usually don't ask us to do things on Friday nights. So it's either because people don't actually like us very much (always a possibility), or they know that we are looking forward to sitting at home in our jammies, curled up on the couch with a Lifetime movie, a bottle of wine, and pizza.

We love our Friday nights. We look forward to them all week long. There's no better way to unwind after a long week than with wine, a bad movie, and a delicious pizza. And for our pizza to be truly delicious, it has to start at home. We used to be more open to ordering pizza back when we lived in the U.S., because sometimes after a particularly long week, even pizza is to tiring to think about. But here, well, Ben works fewer hours, I don't work, and delivery pizza just isn't the same. The Dutch just don't have Papa John's. Or good local places (in our area, anyway). It's just not the same.

So of course we make our own! Would you expect anything less?

We start with a whole wheat pizza crust, which we have adapted from a recipe on epicurious, and which Ben has perfected. I may often be the kitchen genius around here, but Ben, he is the pizza dough master. It's light and puffy and slightly chewy, but it's not too much. It's just substantial enough to hold up whatever toppings we pile on.

Sometimes we follow a recipe if we're feeling adventurous and want a new flavor, but often we just go with some of our standard toppings including, but not limited to: canned diced tomatoes with basil, garlic and oregano; fresh tomatoes slow roasted with garlic when they're in season; spinach; caramelized shallots or grilled cipollini onions; shredded mozzarella, provolone, feta, parmesan; fresh basil. We also have guest appearances by ingredients such as portabello mushrooms, chicken, sun dried tomatoes, roasted garlic, steak, peppers, artichoke hearts... Whatever sounds good. That's the joy of making our own pizza.

The other joy is sitting on the floor in pajamas and watching the pizza cook.

Mmmm...

And voilà! Pizza!

Since we don't follow a recipe most of the time, I can't give you directions for our particular brand of pizza. You'll have to find your own signature flavors. But we can give you a good starting place, our pizza dough recipe (from epicurious, as adapted by Ben)

Pizza Dough

Ingredients

1 (1/4-ounce) package active dry yeast (2 1/4 teaspoons)
1/2 cup whole wheat flour
1 1/2 to 2 cups bread flour plus additional for kneading and dredging
1 cup warm water (105 - 115°F)
1 teaspoon salt
2 teaspoons italian seasoning (or grated parmesan, or whatever sounds good to you)

Preparation

Make dough:
Whisk together yeast, 1 tablespoon flour, and 1/4 cup warm water in a measuring cup and let stand until mixture develops a creamy foam, about 10 minutes. (If mixture doesn't foam, discard and start over with new yeast.)

Stir together salt and 1 cup bread flour and 1/2 cup whole wheat flour and seasoning in a large bowl. Add yeast mixture and remaining 3/4 cup warm water and stir until smooth, then stir in another 1/2 cup bread flour. If dough sticks to your fingers, stir in just enough flour (up to 3/4 cup), a little at a time, to make dough just come away from side of bowl. (This dough may be wetter than other pizza doughs you have made.)

Knead dough on a lightly floured surface with floured hands, lightly reflouring work surface and your hands when dough becomes too sticky, until dough is smooth, soft, and elastic, about 10 minutes.

Or, if you have a mixer with a dough hook, mix on low until the dough comes together and then on high until it's nice and smooth. Then knead it by hand for a minute or so and form into a ball.

Place the dough in an oiled bowl, cover, and let rise in a warm place until doubled in bulk, about an hour. Divide into two balls. If you only want to use one, the extra dough keeps well in the freezer. We just put in a ziploc freezer bag and then bring it out several hours before we need it and set it on the counter to let it come to room temperature.

To bake the pizza, preheat the oven and pizza stone (or cookie sheet) at the highest temperature possible for an hour or so. A very hot oven and pizza stone makes the crust nice and crispy on the bottom. Roll dough into a circle with a rolling pin or work it into a circle with your hands and place it on the pizza stone. Top the pizza with whatever you want and bake for about 12-15 minutes, or until cheese is turning golden brown at the edges.

Turn on your Lifetime movie, open your wine, enjoy!

Friday, February 20, 2009

This is how I roll

Today I offer a little insight into what goes on inside my mind and inside my kitchen when I'm left unsupervised.

I spend a lot of time thinking about food. When I'm not browsing food blogs, I'm playing games with myself, thinking up new flavors of ice cream, cupcakes, whatever. Recently, I was brainstorming cupcake ideas with Ben and he was thinking raspberry, I was thinking something with a caramel filling. And, oooh, raspberry caramel would be good. Taking stock of my kitchen, I decided to attempt a raspberry flavored dulce de leche.

It was good, definitely tasty. A nice combination of the sweet caramel creaminess and the slight tartness of the raspberries. It was lovely. But I didn't want to use it in my cupcakes. It just wasn't right.

So then I had a container of raspberry caramel sitting in my fridge. Taunting me. Every so often I would go back to it and take a little spoonful and ponder its fate. Cupcakes? Still no. Filling for sandwich cookies? Maybe. But I don't know what kind of cookies to make. Use it in/on ice cream? Nah. Toss it and call it a day?

I was actually about to just get rid of it because I didn't know what I wanted to do and I'm a little obsessive (who me?) about having a neat and tidy refrigerator, free of rogue leftovers and random items. But then Ben got around to finally tasting it and said, "Oh, that's nice".

"Oh, well, I was about to throw it away. It's been sitting there and I don't know what to do with it."

"Well, it's good. Don't throw it out just yet."

"Ehhh..."

"Give it until the end of this weekend. Maybe I'll just eat it."

"Okay."

So the raspberry dulce de leche got a stay of execution. And Ben's admiration of it inspired me to get cracking and just try something with it.

This is what I came up with.


Raspberry Dulce de Leche Balls


1/3 seedless raspberry preserves*
1 14 ounce can sweetened condensed milk
8 oounces dark chocolate
Fancy colored sugar (optional)

*I only found raspberry jam with seeds, so I heated it a little to make it liquidy, and then strained it. Easy peasy.

Pour the sweetened condensed milk into top of double-boiler pan and stir in raspberry Usually when making dulce de leche, I know it's done because it gets a lovely golden caramel brown color, but with the raspberries it will be harder to judge. Because it's pink. I would err on the side of a few more minutes if you're not sure.

Remove from heat and whisk until smooth. Put in the refrigerator to chill. Once the dulce de leche is nice and cold and firmed up a bit, scoop spoonfuls and then roll into balls. It'll be sticky, so I found it's easiest to roll with slightly damp hands.

Put the balls of caramel on a parchment lined cookie sheet and place in the freezer.

Chop the chocolate and place in the top of a double-boiler, or a bowl set over a simmering pan of water. Melt the chocolate, stirring occasionally and then remove from heat.

Working quickly, take each cold caramel ball and drop into the chocolate using two forks to turn, coat, and remove from chocolate. Tap off any excess and place the caramel on a silpat or piece of parchment paper. Sprinkle with fancy pretty sugar, if desired, and let set. Eat. Admire the pretty chocolates. Eat another.


And they're pretty good. A sweet, fruity, soft caramel that melts in your mouth after your teeth crack the bittersweet chocolate shell. And pink sugar sprinkles! Just for fun! Something pretty for me to make, and a more dignified way for Ben to eat a bowl of caramel. Everybody wins!

Except for Wesley.

We keep telling him he at least needs to grow some teeth first. Man, he's gonna be disappointed when he gets teeth and I still don't give him candy.

Friday, February 13, 2009

Sweets for the sweet

What better way to say Happy Valentine's Day than with some sweet chocolate treats with a pretty, fluffy pink frosting?


I haven't baked many good treats recently and I have been missing them. I've been more on a bread kick lately, and while bred is nice and tasty and good, it's just not very pretty or fun. So I thought that I should bake something a little more decadent to send to work with Ben this week in honor of Valentine's Day.

Now, I know to some Valentine's Day is nothing but a Hallmark holiday, consumerism at it's finest, unrealistic expectations of fairytale romance that are doomed to failure in the cold, harsh reality of the world. And there are also those who say, indignantly, "Why should we have to confine romance to one day? The Man is just trying to get us to spend money on commercial junk! I'm perfectly capapble of showing my love every day of the year!" But to those people, I have to ask... Do you really buy your sweetheart a big bouquet of flowers on a random Tuesday? A box of chocolates to celebrate a long and dreary work week? Do you bake them little chocolate cupcakes with fluffy pink frosting just for the heck of it? If so, then go ahead with your romantic self.

If not, however, I suggest you make these for your favorite person. They might just agree to be your Valentine.

Flourless Chocolate Cupcakes (from Cupcake Project) with Raspberry Cream Cheese Frosting (from me)

Makes about 18 cupcakes or a bajillion mini cupcakes

1/2 cup water
1/4 tsp salt
18 oz bittersweet chocolate chopped into small pieces
1 C unsalted butter (room temperature)
3 eggs
3 egg whites

Combine the water, salt, and sugar in a small saucepan over medium heat. Stir until completely dissolved and set aside.
In the top half of a double boiler, melt the bittersweet chocolate, then pour the melted chocolate into the bowl of an electric mixer.
Cut the butter into pieces and beat the butter into the chocolate, one piece at a time.
Beat in the hot sugar-water. Next, slowly beat in the eggs and the egg whites one at a time.
Pour the batter 3/4 to the top of lined cupcake tins. These don't rise so you can go higher if you'd like. Have pans larger than the cupcake tins ready. Put each cupcake tin in a larger pan and fill the pan with boiling water halfway up the sides of the cake pan. (Don't be like me and accidentally overfill the water. You may have to eat any flooded cupcake casualties.)
Bake cupcakes in the water bath at 300 degrees F (150 degrees C) for 30 minutes. The center will still look wet.
Do not take the cupcakes out of the tin until they are completely cooled! Once the tins are cool enough to handle with your bare hands, put the entire cupcake tin in the fridge until it is cool. Then remove the cupcakes from the tin and frost. If you take the cupcakes out of the tin while they are still warm, they will lose their shape.


Raspberry Cream Cheese Frosting

4 oz cream cheese
4 oz butter
1/4 cup raspberry jam
3 1/2 cups powdered sugar

Beat cream cheese and butter together until creamy and fluffy. Add raspberry jam and beat well. Add powdered sugar and beat for a long time until frosting in smooth, light, and fluffy. When in doubt, just keep beating the icing. I tend to just turn my mixer on and let it go for a little while. Otherwise I get too impatient standing around and I want to use the frosting before it's reached its true fluffiness potential.

I also added about two drops of red food coloring to make it just a little bit prettier, but the frosting had a nice pink color already, so that is completely optional.

Makes about 4 cups.

Sunday, February 8, 2009

Corn fritters, that's where is started. This week while idly gawking at all the food pictures on foodgawker, my heart stopped. Corn fritters! I love corn! Fritters! I've had them before, but it had been a while and I couldn't for the life of me understand why I have not been making them all this time. So I bookmarked the blog that had these little bites of corn wonder and decided that we should have corn fritters for dinner one night.

Ben was not as enthusiastic. So I proposed corn fritters and a really nice salad. "Okay...", he said. I sensed that he did not feel the same joy at the idea of corn fritters as I did. Hmph.

The corn fritters stayed on my mind. Then... ding! (That's the sound of my mental light bulb) I could make the corn fritters, but just serve them as a small side to a spinach salad topped with pan seared scallops. Oooh, that could be good. Scallops make everything better! I proposed this to Ben and his eyes lit up, "Scallops! I love scallops!" Excellent.

And it was excellent until I went to cut the corn of the cob.

Why am I lying on the floor of the bathroom?

And what is Ben doing with that first aid kit?

That's right, folks, Ellen has still not mastered the art of sharp objects. I'm lying on the floor because while Ben was trying to bandage me, I got a little woozy. It was no good. Luckily no corn was injured. Just my finger. Sigh.

Back in the kitchen, Ben took over the chopping and I got to crack the egg and put everything in the bowl.


And against our better judgment, I went on to actually cook the fritters. In oil, no less! And I am pleased to report there were no more injuries, to myself or the food.

For me, the corn was the main focus, but I know I'm probably alone in that, so for the rest of our meal I put together a salad of spinach, arugula (Ben's suggested addition, caramelized shallots, and roasted red peppers (from a jar! The shame!). I then seared a few scallops and added them on top. The corn fritters went around the edge of the plate with some chili sour cream.


Ben loved the scallops, and surprisingly enjoyed the corn fritters immensely too. He gave them a big thumbs up, so we'll have them again. Maybe next time I can convince him to just have a big plate of fritters for dinner. Or maybe not.

Corn Fritters from I Found Happy

(I made half the recipe and we had a few extra to snack on while assembling dinner)

Corn Fritters (adapted from the Joy of Cooking)
Makes 24 fritters
Ingredients:
16 oz. frozen corn, thawed and drained (I used corn on the cob. It's what I had. I learned my lesson. Frozen corn requires no knives.)
2 egg yolks
2 tbsp flour
1 tbsp sugar
1/4 cup chopped chives or green onions
1/4 tsp salt
1/4 tsp garlic powder
1/8 tsp ground black pepper
2 egg whites
2 tbsp oil

Directions:

Combine first 8 ingredients in large mixing bowl and mix well. Gently mash corn a little with a fork until it's a little pulpy. In a separate bowl, beat egg whites until peaks form. Gently fold into corn mixture and be careful not to over mix it.

Heat oil in large skillet over med-high heat and drop in corn mixture by the heaping tablespoon. Cook 2 minutes on the first side or until nice and golden brown, then flip and cook until browned on the other side.

Monday, January 26, 2009

Pancakes!

I have been wanting to write this blog post forever. But there's always been one slight problem.

Let me start at the beginning. First, I have a really great husband. An understanding husband who recognizes that I cannot, cannot, function in the morning but also knows that I loooove breakfast. I especially love "special" breakfasts, like french toast, waffles, and pancakes. Oh, pancakes. A while back, my dad e-mailed me a pancake recipe that they got from a friend of theirs, and I was intrigued by it. We had previously been Bisquick devotees, but as delicious as they could be, Bisquick pancakes were a little too much for me and I was dreaming of something better, maybe something whole grain, but not all dry and yucky. So when I saw this recipe that included oats and cottage cheese and no flour, and that came with high praise from my parents (a couple of serious foodies), I had to give it a shot.

And by give it a shot, I mean decided to have Ben make them for me. I'm serious. I don't do stoves in the morning, unless it's Ben's birthday and then I am oh so wonderful and I even make bacon (it should be noted that I don't do meat and splattering grease in the morning either). And, good man that he is, he made them without even a little protest.

And lo and behold, these funky little oatmeal and cottage cheese pancakes were delicious! They taste like normal pancakes, but don't leave me slumped over my chair saying "Uhhhh... too... many... pancakes". They're just plain yummy. And, lucky girl that I am, Ben makes them for me on a semi-regular basis.

So, back to this problem I mention earlier. I know you're thinking, "Problem? What problem could you possibly have? You laze around in bed on weekends while your husband makes you your favorite breakfast. Whatever, lady."

But really, this is kind of a problem. You see, I've been wanting to blog about this pancakes joy for ages, but every time he makes pancakes, I find myself with an empty plate, a full belly, and I smile on my face, and then I say, "Doh! I was going to take pictures and blog this!" I just could never contain my happiness on pancake day long enough to maintain rational thought and get the camera.

Until now.


When we went grocery shopping on Friday, I saw Ben put cottage cheese in the cart. And then he told me to pick out some sausage. Ooooh, it was gonna be a pancake weekend! And it was! On Saturday morning, Ben and Wesley got up and headed down to the kitchen to make something special for Mama.


Yum, yum, yum.


Wesley was very interested, and felt that he deserved a pancake for all his hard work helping his Da with breakfast, but we're mean parents. No pancakes for baby!


Ellen's Pancakes
Makes about 16 silver dollar sized pancakes, enough for 2 hungry people

4 eggs
8 oz cottage cheese
3/4 cup oats
2 tablespoons oil
1/4 teaspoon salt

Put everything in a blender and mix until smooth. You can do this the night before if you want, especially if you are morning non-functional like me and don't have a Ben around to make you pancakes.

Drop batter by heaping tablespoons on a greased hot griddle. Flip when under side is golden brown. They need to be cooked just a tiny bit longer than normal pancakes to make sure the oats are cooked and the insides aren't goopy. And they shouldn't be big pancakes because they won't cook as well.

Top with fruit and/or nuts if you're feeling virtuous, or butter and maple syrup if you're not. Either way, they are healthier than your average pancake with fiber, protein, etc etc. So I vote that you give them some real maple syrup, you deserve it! Enjoy!

Sunday, January 11, 2009

Tastes like victory

I've been cursing a lot lately. Why? Is it because I want my baby's first word to be @&#$@!? Or because I'm trying on a new, meaner, cruder personality? No... It's just because I'm frustrated. Here's how things go: 1)I find a recipe I want to make. 2) I think "Oooh, I just need to go get ____ and then I'll make this for dinner! 3) I go to the store, where I know they should carry ____, because it's not something totally crazy and unheard of, and sure enough they don't have it. 4) I then try every possible grocery store and come up empty-handed every time. 5) I curse.

This has happened with various ingredients - Panko crumbs, tahini, spring roll wrappers, peppermint extract. And now, the most recent, spinach. Yes, spinach. Most of the time this only happens with ingredients that I don't buy regularly, but that I know I could find pretty easily if we lived in Minneapolis. Spinach, though? We live on spinach. We buy it all the time, just to have it around. Just in case we need a salad or something. So when I found a recipe for a spinach and chickpea curry, I thought my real problem would be finding the garam masala (it was a problem, by the way. Stupid stores had 8 million Indian food spices, pastes, etc etc etc, but no garam masala. This makes no sense to me. I found it eventually, though, at the same place I find my spring roll wrappers), and that I could just pick up some spinach whenever. What a joke. No spinach at the commissary for about a week straight. No spinach at various Dutch grocery stores. Something labeled as spinach at the market, but it really looked like no spinach I had ever seen before. Hmph.

Imagine my delight as I went in to a local grocery store on Friday to look for garam masala and saw huuuuge bags of spinach as I passed through the produce department! Victory! On to the "Ethnic foods" aisle to concur Indian spices! Err, or not. They had no garam masala, of course, so I stood clutching my basket full of spinach, scanning the shelves, wavering between my feelings of triumphant victory and crushing defeat. And then... delight! They had no garam masala, but they had my favorite stir fry sauce! And a new section of spices in the Thai foods section! Spices that I've been wanting badly but hadn't even bothered looking for! Thai basil! Kaffir lime leaves! Lemongrass! I gleefully put them in my basket and headed off to curse their lack of greek yogurt in the refrigerated section.

When I got back out to the car, Ben was waiting for me. While I had been in the store, he and Wes had been circling the parking lot (it was busy, and full, and costs money to park) where I had left him with an assignment. I had told him to think about what he wanted to do for dinner the following night since he would be leaving for a business trip this week and we would only have one dinner together until he got back. So after I got back in the car and we started to head to the commissary to finish our shopping, I asked if he thought of anything. "Well," he said, "I thought maybe we could cook something together".

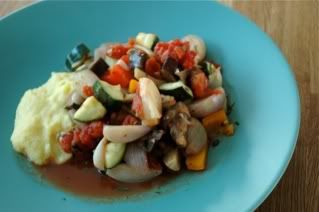
Yay! Another episode of Cooking with Ben and Ellen! "Ooooh! Maybe we can find a recipe that uses THESE!" I said, brandishing my shiny new containers. We agreed, and when got home, Wesley and I settled on the couch for a nice bottle of formula and some internet food searching. And we came up with this: Cod with Coconut, Lime, and Lemongrass Curry Sauce. Mmmm, and it required lemongrass AND kaffir lime leaves! Also, it calls for cilantro, but I hate cilantro with a passion, so I decided could sub my new thai basil for cilantro. Three for three! This was definitely taking the sting out of my lack of garam masala.

So last night, armed with fresh and delicious cod from the market, we set to work.

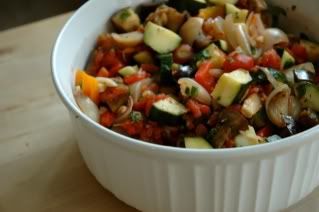
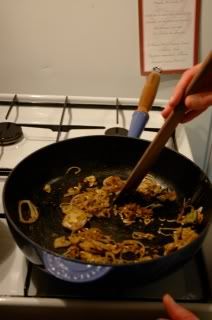
This doesn't look very pretty, but can I just tell you how incredibly amazing it smelled? Shallots, garlic, ginger, lime, curry... amazingly good smells were happening in our kitchen.


We added some coconut milk and let that sauce simmer and tried not to eat it with a spoon as it cooking, and then strained it. And promptly decided that the shallots, garlic, etc that we strained out shouldn't go to waste and that we would eat those too.

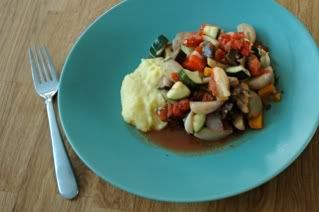
And then it was time for the cod. Fish is easy usually, but not very exciting.


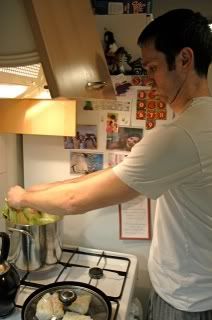
The recipe called for baby bok choy, but we only could find very large bok choy, so Ben had an interesting time fitting it in the pot o' boiling water.


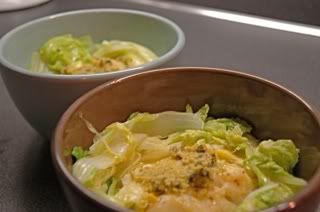
The finished product might not look terribly exciting, but it was really really delicious. We had some sauce and bok choy left over, so we ate a couple bowls of bok choy with curry sauce too. Yum. Yum. Yum.


Cod with Coconut, Lime, and Lemongrass Curry Sauce

Epicurious | 2005

yield: Makes 4 servings

Ingredients
The Sauce:

* 1 tablespoon butter
* 2 shallots, thinly sliced
* 3 garlic cloves, thinly sliced
* 1 lemongrass stalk, thinly sliced
* 1-inch knob ginger, thinly sliced
* 3 kaffir lime leaves
* 1 tablespoon Madras curry
* 3 cups chicken stock
* 3/4 cup fresh coconut milk, or canned
* 4 cilantro sprigs
* Fine sea salt to taste
* Freshly ground white pepper to taste
* 1 tablespoon fresh lime juice


The Cod:

* 2 tablespoons canola oil
* 4 7-ounce cod fillets, 1 1/2-inches thick
* Fine sea salt to taste
* Freshly ground white pepper to taste


The Garnish:

* 1/2 pound butter
* Fine sea salt
* 9 heads baby bok choy, divided in half (quartered if large)
* 1/4 cup kosher salt


Special equipment:

* 2 10-inch nonstick ovenproof skillets

Preparation

Preheat the oven to 400°F.

To make the broth, melt the butter in a small sauté pan or wok over medium heat. Add the shallots, garlic, lemongrass, ginger, kaffir lime leaves and curry and sweat until tender and with no color, about 5 to 6 minutes. Add the chicken stock and bring to a boil. Lower the heat simmer for 15 minutes. Add the coconut milk and cilantro, and simmer for 5 minutes. Season to taste with salt and pepper. Strain through a fine chinois and set aside.

Divide the 2 tablespoons of canola oil between the skillets. Place over high heat until oil is just smoking. Season the cod on both sides with salt and pepper. Put 2 pieces of cod in each skillet and sauté until golden brown and crusted on the bottom, about 2 1/2 minutes. Turn and sear on the other side for 30 seconds. Put the pans in the oven and roast until a metal skewer can be easily inserted into the fish and, when left in the fish for 5 seconds, feels hot when touched to your lip, about 6 to 7 minutes.

In a large pot, heat 4 quarts of water, the butter, and the kosher salt. Bring to a boil over high heat. Add the bok choy and cook until crisp tender, about 4 minutes. Remove with a slotted spoon and set aside on a sheet pan in the refrigerator to cool quickly so they retain their bright green color.

To serve, reheat the sauce and finish with the lime juice. In each of 4 bowls, place a piece of cod. Place 3 to 4 pieces of bok choy around the cod. Pour the sauce over the cod and serve immediately.


Saturday, January 10, 2009

I was going to post a Baking Gals Round 5 round up post ages ago, but somehow life/holidays got in the way and before I knew it we were traveling around the world, eating, drinking, opening presents, and then eating some more. And blogging got postponed and postponed.

And now that I'm back, I seem to have, um, er, lost my stuff. I know I have the Round 5 pictures somewhere. And info on what people made. But I can't tell you where it is. Oops.

I can tell you that I made a ton of Christmas treats, including Trios, Gingerbread, Brown Sugar Fudge and Mini White Chocolate Cranberry Oat Fudge Cups. And that we had a great team and Steven received lots of yummy things from lots of great people. But, uh, that's all I got right now.

A big thank you to everyone who participated in Round 5, and I'm sorry, and I hope you'll forgive me and accept as a peace offering a brand new blog post in the next couple days. With pictures and everything!